A Beginner's Guide to Building a Kubernetes Device Plugin
Kubernetes is a powerful system for managing containerized applications in a cluster, allowing you to easily deploy, scale, and manage your applications. But sometimes you need access to specialized hardware resources like GPUs or FPGAs in order to run your applications optimally. That's where device plugins come in!
Device plugins allow you to make specific hardware resources available to your Kubernetes applications. Instead of modifying the Kubernetes code itself, vendors can create a device plugin that you can install on your cluster. This plugin can then advertise resources like high-performance NICs, InfiniBand adapters, and other specialized hardware to the Kubelet, which is responsible for managing pods and containers on a node.
Using device plugins, you can ensure that your applications have access to the hardware resources they need to run optimally, without having to modify the core Kubernetes code.
Resource Management in Kubernetes
Resource management is a key aspect of running applications in Kubernetes. It allows you to specify how much CPU and memory (RAM) your containers need, which helps the kube-scheduler decide where to place your Pods and the kubelet ensures that your containers don't use too many resources.
Here's an example of how resource management works in Kubernetes:
Simple Resource Example
apiVersion: v1
kind: Pod
metadata:
  name: frontend
spec:
  containers:
  - name: app
    image: images.my-company.example/app:v4
    resources:
      requests:
        memory: "64Mi"
        cpu: "250m"
      limits:
        memory: "128Mi"
        cpu: "500m"
  - name: log-aggregator
    image: images.my-company.example/log-aggregator:v6
    resources:
      requests:
        memory: "64Mi"
        cpu: "250m"
      limits:
        memory: "128Mi"
        cpu: "500m"
This manifest file creates a Pod with two containers inside of it. For each container, we specify resource requests (the minimum amount of resources the container needs to function) and resource limits (the maximum amount of resources the container is allowed to use). In this case, both containers have a request for 64MiB of memory and 250m of CPU, and a limit of 128MiB of memory and 500m of CPU.
The kube-scheduler uses the resource requests to decide which node to place the Pod on, and the kubelet enforces the resource limits to ensure that the containers do not exceed the specified limits. This helps to ensure that the containers have access to the resources they need to function correctly, while also preventing them from using too many resources and potentially impacting the performance of other containers or the node itself.
FPGA Resource Example
Sometimes you need access to specialized hardware resources like FPGAs in order to run your applications optimally. That's where device plugins come in!
Here's an example of how you can use device plugins in Kubernetes to request and limit access to FPGAs:
apiVersion: apps/v1
kind: Deployment
metadata:
  name: fpga-app
spec:
  replicas: 1
  template:
    spec:
      containers:
      - image: images.my-company.example/fpga-app:v0.1.0
        name: fpga-app
        resources:
          requests:
            my-company.com/1dfft: 1
            memory: "64mi"
            cpu: "250m"
          limits:
            my-company.com/1dfft: 1
            memory: "128mi"
            cpu: "500m"
Device plugins allow you to make specific hardware resources available to your Kubernetes applications. In this case, we're using a device plugin to request and limit access to 1 FPGA device with a 1dfft loaded onto it.
The kube-scheduler will use these resource requests to decide which node to place the Pod on, and the kubelet will enforce the resource limits to ensure that the container doesn't exceed the specified limits for this resource. This helps to ensure that the container has access to the FPGA it needs to function correctly, while also preventing it from using too many resources and potentially impacting the performance of other containers or the node itself.
Overall, device plugins work very similarly to CPU and memory resources in terms of resource requests and limits. They allow you to specify the minimum and maximum amount of a particular physical device that a container needs or is allowed to use, and the kube-scheduler and kubelet enforce those limits to ensure that the container has access to the resources it needs while also preventing it from using too many resources.
Kubernetes Device Plugin Architecture
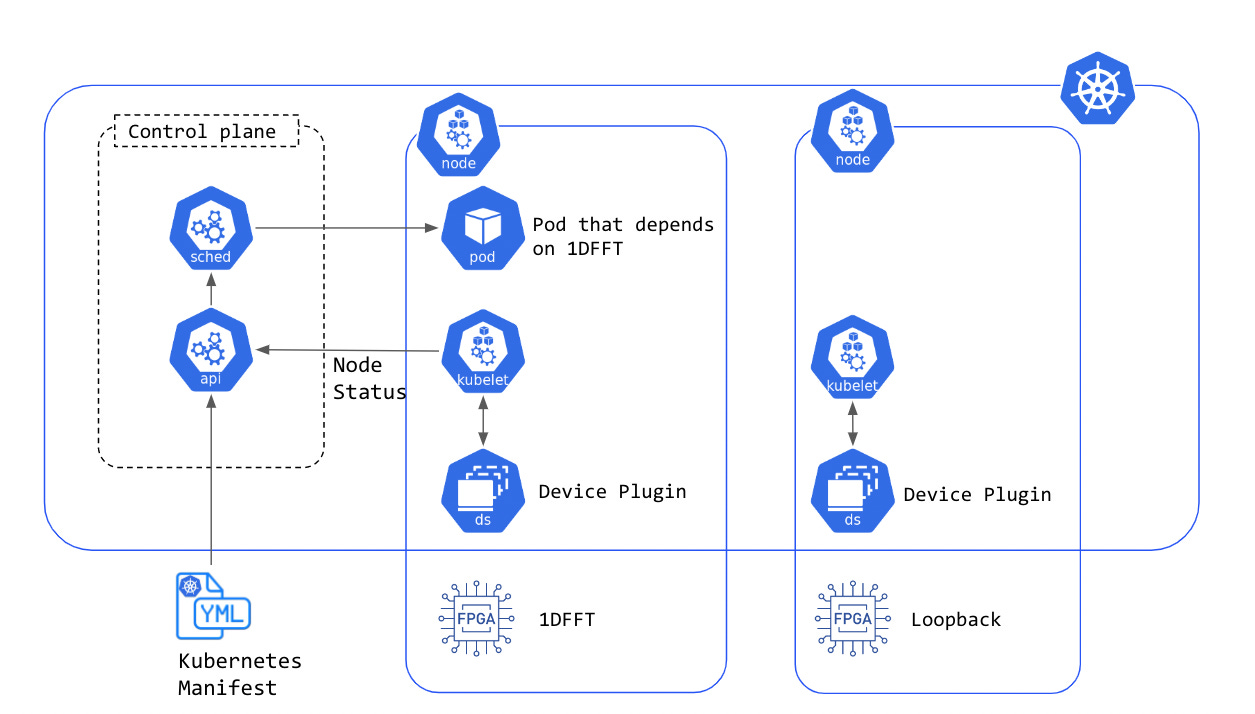
Let's take a look at a diagram that illustrates how device plugins work in Kubernetes.
When you apply a Kubernetes manifest to your cluster, the scheduler uses its knowledge of the available resources on each node to decide which node to place your pod on. This includes any specialized hardware resources like FPGAs that you've made available through device plugins.
Speaking of device plugins, it's important to understand how they communicate with the host node to determine which resources are available, and how they broadcast that information to the rest of the cluster. That's what we're going to cover next!
How to Create a Device Plugin
Sometimes, companies that make specialized hardware like NVIDIA GPUs or Intel FPGAs will create device plugins that you can easily install in your Kubernetes cluster to make those resources available to your containers. But what if your organization has its own custom specialized hardware that it wants to use in a Kubernetes cluster?
Don't worry, you can still make those resources available to your containers through the use of custom device plugins! I recently ran into this situation myself, and it was actually a really interesting challenge to figure out how to make our custom hardware accessible to our containers.
Device Plugin Framework
So, how does it work? The Device Manager, which lives inside the kubelet, is responsible for facilitating communication with device plugins. It does this using gRPC over Unix sockets. Both the Device Manager and device plugins act as gRPC servers and clients by serving and connecting to gRPC services. Device plugins provide a gRPC service that the kubelet can connect to for device discovery, advertisement (as extended resources), and allocation. The Device Manager, on the other hand, connects to the Registration gRPC service provided by the kubelet to register itself.
gRPC
Services within Kubernetes often talk to each other over gRPC, which is a modern open source high-performance Remote Procedure Call (RPC) framework developed by Google. It uses Protocol Buffers for serialization and Interface Definition Language (IDL), and offers streaming capabilities for efficient communication between client and server applications.
For more information about gRPC, take a look at the docs, but for our purposes we appreciate that Google already released a package to interface directly with the Device Plugin Framework via gRPC.
Examples in this blog post will use the go package mentioned above.
Initialization
When implementing a device plugin, the first thing we need to do is initialize it. This involves making sure that our devices are ready to go (or resetting them if necessary), configuring the system, and setting up listeners for resets and system signals. This step is crucial to ensure that our plugin is properly prepared to communicate with the kubelet and make our devices available to our Kubernetes applications
Often this step involves interfaces with devices directly in Linux via SysFS.
After device specific initialization is complete, the device plugin needs to start a gRPC server under host path /var/lib/kubelet/device-plugins/, that implements the following interface:
service DevicePlugin {
      // ListAndWatch returns a stream of List of Devices
      // Whenever a Device state change or a Device disappears, ListAndWatch
      // returns the new list
      rpc ListAndWatch(Empty) returns (stream ListAndWatchResponse) {}

      // Allocate is called during container creation so that the Device
      // Plugin can run device specific operations and instruct Kubelet
      // of the steps to make the Device available in the container
      rpc Allocate(AllocateRequest) returns (AllocateResponse) {}

      // GetDevicePluginOptions returns options to be communicated with Device Manager.
      rpc GetDevicePluginOptions(Empty) returns (DevicePluginOptions) {}

      // optional to implement (see docs for more details)
      rpc PreStartContainer(PreStartContainerRequest) returns (PreStartContainerResponse) {}
      rpc GetPreferredAllocation(PreferredAllocationRequest) returns (PreferredAllocationResponse) {}
}
Note that the Device Plugin API is unstable as of writing of this blog post, and will possibly change in the future.
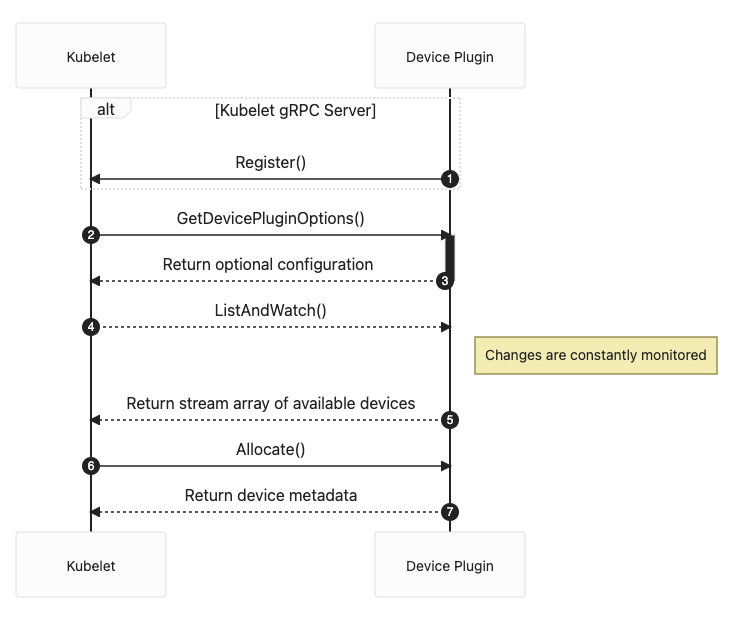
Below is an abridged sequence diagram (not all optional components are included) of the protocol between the gRPC server of the Device Plugin and the Kubelet.
(1-3) Registration
Your first step is to tell the Kubelet that there is a gRPC server running on a UNIX socket ready to handle requests from the Kubelet moving forward. This will look something like this:
package main

import (
	...
	pluginapi "k8s.io/kubelet/pkg/apis/deviceplugin/v1beta1"
)

// register gRPC service that implement pluginapi.DevicePluginServer
pluginapi.RegisterDevicePluginServer(grpcServer, srv)
Where grpcServer will be the actual running gRPC server and srv is an implementation of the Device Plugin Server interface.
(4-5) Discovery
Next the Kubelet will want to get information about the devices on the host, so it can be broadcast to the rest of the cluster. The device plugin implementation of GetDevicePluginOptions and ListAndWatch should look something like:
// return no special options
func (srv *dpServer) getDevicePluginOptions() *pluginapi.DevicePluginOptions {
	return &pluginapi.DevicePluginOptions{
		PreStartRequired:                false,
		GetPreferredAllocationAvailable: false,
	}
}

// ListAndWatch returns a stream of List of Devices
func (srv *dpServer) ListAndWatch(empty *pluginapi.Empty, stream pluginapi.DevicePlugin_ListAndWatchServer) error {
	resp := new(pluginapi.ListAndWatchResponse)
	for devId, dev := range Devices {
                device := pluginapi.Device{
		        ID:     devId.String(),
			Health: pluginapi.Healthy,
		}
		resp.Devices = append(resp.Devices, &device)
	}

	if err := stream.Send(resp); err != nil {
		return err
	}

	for {
		select {}
	}
}
(6-7) Allocation
Once the Kubelet knows about the devices available on the node, it will start making allocation requests when pods are scheduled against the resources. This is the most interesting part of the communication protocol, because the device plugin can request Kubernetes mount environment variables or volumes into the pod in addition to reserving the resource so no other pod can access it until it’s released.
The allocation implementation will look something like.
// Allocate is expected to be called during pod creation since allocation failures for any container would result in pod startup failure.
// AllocateResponse includes the artifacts that needs to be injected into a container for accessing 'deviceIDs' that were mentioned as part of 'AllocateRequest'.
func (srv *dpServer) Allocate(ctx context.Context, reqs *pluginapi.AllocateRequest) (*pluginapi.AllocateResponse, error) {
	allocateRes := &pluginapi.AllocateResponse{}
	for _, req := range reqs.ContainerRequests {
		containerAllocateRes := &pluginapi.ContainerAllocateResponse{}
		for _, deviceId := range req.DevicesIDs {
			if _, exists := devices[deviceId]; !exists {
				err := status.Error(codes.NotFound, "deviceId="+deviceId+" was not found")
				return nil, err
			}
		}

                // request that mounts/environment variables be added to the pod
		envs, envMap := Envs(srv.dm, req.DevicesIDs)
		mounts, err := srv.mounts(envMap, *mappingFileHostPath, regName)
		if err != nil {
			ret := status.Error(codes.FailedPrecondition, err.Error())
			return nil, ret
		}

		containerAllocateRes.Envs = envs
		containerAllocateRes.Mounts = mounts

		allocateRes.ContainerResponses = append(allocateRes.ContainerResponses, containerAllocateRes)
	}

	return allocateRes, nil
}
Once allocated, the resource will be available to the pod and reserved so that no other pods can access the resource until it is released.
Next Steps
As with most pieces of software, the Device Plugin Framework is deeper than this blog post can cover and a production implementation will need to do more than described here like handle resets, but this document should get you started down the path of creating your own custom device plugin.
Kudos to the Kubernetes team (and it’s extended open source community) for creating such and extensible architecture.


Great article, thank you! Could you please let me know what is your effort estimation for writing a production-grade device plugin?